
Preface
I wrote an article earlier [iris-go framework construction and login API project development process]. Due to the length, the article did not introduce how to implement permission control. Next, I will introduce how to use casbin to implement permission control in the iris project. The project uses grom for data processing.
This article is purely based on my personal opinions and experiences. If there are any mistakes, please point them out.
Continuing to talk some nonsense here, the original IrisAdminApi project used the most original RBAC permission control implementation. It created roles and permissions tables respectively, then defined the association relationship and wrote some association creation logic. During the implementation process, I found that whether you use gorm, xorm, or beego’s ORM, it is quite troublesome to define relationships, especially multi-pair relationships, and some polymorphic relationships, etc. Maybe you are used to using Laravel and find that the framework is too complete, which will really hinder your own improvement.
At this time, I wondered if anyone else had implemented a good permission control wheel. After a search, I found casbin. This was my first acquaintance with casbin.
When I first saw casbin, I actually didn’t know how to start. After all, I had never seen a similar project. I believe many newbies will feel the same way. But it doesn’t matter. Once you are born, you will become familiar again. Good socialist young people like us who have gone through nine years of compulsory education are not afraid of learning new things.
Let me briefly introduce my ideas for learning casbin:
- First of all: read the documentation, just like reading the manual when buying something new. It is an essential step in learning any new thing. You don’t need to memorize it completely, just have a rough impression. You can read it several times if you don’t understand it, don’t be afraid of trouble.
- Next: Find the function we need in the document. What we need is an RBAC permission control that works with gorm. I happened to find that the author has written gorm-related adapters. In fact, the author has written many adapters for different languages, which can save us a lot of time.
- Open the gorm-adapter project and follow the instructions to install the adapter:
go get github.com/casbin/gorm-adapter- Check out the example code. Many projects have example code. In fact, the value of these codes is higher than the value of documents, which allows us to better understand the project. Especially the comments need to be read carefully.
package main

import (
	"github.com/casbin/casbin/v2"
	gormadapter "github.com/casbin/gorm-adapter/v2"
	_ "github.com/go-sql-driver/mysql"
)

func main() {
	// 初始化一个 Gorm 适配器并且在一个 Casbin enforcer 中使用它:
	// 这个适配器会使用一个名为 "casbin" 的 MySQL 数据库。
	// 如果数据库不存在,适配器会自动创建它。
	// 你同样也可以像这样 gormadapter.NewAdapterByDB(gormInstance) 使用一个已经存在的 gorm 实例。
	a := gormadapter.NewAdapter("mysql", "mysql_user:mysql_password@tcp(127.0.0.1:3306)/") //你的驱动和数据源
	e, _ := casbin.NewEnforcer("examples/rbac_model.conf", a)

	// 或者你可以像这样使用一个其他的数据库 "abc" :
	// 适配器会使用名为 "casbin_rule" 的数据表。
	// 如果数据表不存在,适配器会自动创建它。
	// a := gormadapter.NewAdapter("mysql", "mysql_user:mysql_password@tcp(127.0.0.1:3306)/abc", true)

	// 从数据库加载策略规则
	e.LoadPolicy()

	// 检查权限
	e.Enforce("alice", "data1", "read")

	// 更新策略
	// e.AddPolicy(...)
	// e.RemovePolicy(...)

	// 保存策略到数据库
	e.SavePolicy()
}
After reading the code and comments of this example, I believe you already understand how to use casbin. If you don’t understand it yet, read it a few more times.
In the process of reading the document, I found that the author has already written RBAC related API. So we don’t need to repeat these tasks. Didn’t you see that? This illustrates the importance of reading the documentation carefully.
Now we continue the previous project and add the casbin function to the project. Edit the models/base.go file:
var Db *gorm.DB
var err error
var dirverName string
var conn string
var Enforcer *casbin.Enforcer
func Register() {
    dirverName = "mysql"
    if isTestEnv() { //如果是测试使用测试数据库
        conn = "mysql_user:mysql_password@(127.0.0.1:3306)/tiris"
    } else {
        conn = "mysql_user:mysql_password@(127.0.0.1:3306)/iris"
    }
    //初始化数据库
    Db, err = gorm.Open(dirverName, conn+"?charset=utf8&parseTime=True&loc=Local")
    if err != nil {
        color.Red(fmt.Sprintf("gorm open 错误: %v", err))
    }

	a := gormadapter.NewAdapter("mysql",conn)
	Enforcer, _ = casbin.NewEnforcer("examples/rbac_model.conf", a)
	Enforcer.LoadPolicy()
}- Here we do not need to generate a new casbin database, and directly use the iris database to generate the casbin_rule data table. At the same time, copy the
rbac_model.conffile to the corresponding path of your project. In this way, casbin has been integrated, and the corresponding casbin_rule data table will be generated when the project is restarted. - Why are the methods e.AddPolicy(…), e.SavePolicy(), e.Enforce(“alice”, “data1”, “read”) not used? If you still have such questions, it means that you have not read the comments of the examples, or you have not read them carefully. Please read it several times.
- Although we have integrated casbin, we have not yet implemented the purpose of permission control. If realized? We need to associate roles, permissions and other data to users, and check whether the user has permissions when they access the corresponding resources.
- Friends with experience here will find that we need a middleware to detect user permissions. Then we move to iris middleware documentation. If we look through the documentation carefully, you will find that there is already a middleware implementation for casbin. We don’t need to write it ourselves.
- Then come to middleware/tree/master/casbin
According to the documentation, first install casbin and casbin-middleware, and execute the commands respectively:
 go get github.com/casbin/casbin

go get github.com/iris-contrib/middleware/casbin- Then follow the code in the example to add the middleware to the route:
package routers
import (
"IrisAdmin/controllers"
"IrisAdmin/middleware"
"IrisAdmin/models"
"github.com/kataras/iris/v12"
"github.com/casbin/casbin/v2"
cm "github.com/iris-contrib/middleware/casbin"
)
func Register(app *iris.Application) {
// 路由集使用跨域中间件 CrsAuth()
// 允许 Options 方法 AllowMethods(iris.MethodOptions)
main := app.Party("/", middleware.CrsAuth()).AllowMethods(iris.MethodOptions)
{
 v1 := main.Party("/v1")
 {
     v1.Post("/admin/login", controllers.UserLogin)
     v1.PartyFunc("/admin", func(admin iris.Party) {
		casbinMiddleware := cm.New(models.Enforcer)
        admin.Use(middleware.JwtHandler().Serve, middleware.AuthToken,casbinMiddleware.ServeHTTP) //登录验证
         admin.Get("/logout",  controllers.UserLogout).Name = "退出"
     })
 }
}
}- The middleware here has a new
casbinmodel.conffile, and the contents need to be replaced with therbac_model.conffile mentioned earlier. - Now when logging in to the project and accessing any interface, a
403access denied status will be returned, which shows that the middleware is effective. Next we need to use the API provided by casbin to associate the project’s users, roles and permissions with each other. - Open the rbac-api page, and we see that there is an
AddRoleForUser()method to add a role to the user. We add it to the user’s creation and update methods to achieve the association between users and roles.
func CreateUser() (user *User) {
  salt, _ := bcrypt.Salt(10)
  hash, _ := bcrypt.Hash("password", salt)
  user = &User{
      Username: "username",
      Password: hash,
      Name:     "name",
  }
  if err := Db.Create(user).Error; err != nil {
      color.Red(fmt.Sprintf("CreateUserErr:%s \n ", err))
  }

	userId := strconv.FormatUint(uint64(user.ID), 10)
	if _, err := database.GetEnforcer().AddRoleForUser(userId, "1"); err != nil {
		color.Red(fmt.Sprintf("CreateUserErr:%s \n ", err))
	}

  return
}- It should be noted here that the parameters accepted by the
AddRoleForUser()function are all strings, so the user and role IDs need to be formatted. If there are multiple roles, just pass in the IDs of multiple roles and add them in a loop. - Next we need to associate roles and permissions. After searching for a long time on the rbac-api page, we found that there is no way to add permissions. After reading the documentation carefully several times, I determined that there is really no way to add permissions to a role. So, what do we do next? My solution was to look at the source code of casbin. Because I am very sure that the method of adding permissions must exist, but it is not on the rbac-api page.
- Sure enough, I found the relevant method in the documentation:
func (e *Enforcer) AddPolicy(params ...interface{}) (bool, error) {
	return e.AddNamedPolicy("p", params...)
}
Doesn’t it look familiar? That’s right, it’s the method that appeared in the previous adapter instance. Its description is to add a policy. I didn’t expect that the policy was the permission. It was really a leaf blocking the view. People searched for him thousands of times…
- Now that a method has been found, add the logic of role-associated permissions (policy) to the creation and update of roles.
roleId := strconv.FormatUint(uint64(role.ID), 10)
var perms []Permission
models.DB.Where("id in (?)", permIds).Find(&perms)
for _, perm := range perms {
	if _, err := models.Enforcer.AddPolicy(roleId, perm.Name, perm.Act); err != nil {
		color.Red(fmt.Sprintf("AddPolicy:%s \n", err))
	}
}
Similarly, the AddPolicy() function parameters are all strings, and the role ID also needs to be converted.
- After all the data is associated, we create the relevant role and permission data. Users can access and log in normally. Please see the project IrisAdminApi for detailed code.
Postscript
Here is a record of how to use iris to automatically generate permissions (policies).
- First of all, you must start with routing and add names to the routing to facilitate the differentiation of permissions.
app.PartyFunc("/users", func(users iris.Party) {
	users.Get("/", controllers.GetAllUsers).Name = "用户列表"
	users.Get("/{id:uint}", controllers.GetUser).Name = "用户详情"
	users.Post("/", controllers.CreateUser).Name = "创建用户"
	users.Put("/{id:uint}", controllers.UpdateUser).Name = "编辑用户"
	users.Delete("/{id:uint}", controllers.DeleteUser).Name = "删除用户"
	users.Get("/profile", controllers.GetProfile).Name = "个人信息"
})
In this way, the corresponding name can be obtained when obtaining the route.
- How to obtain the routing information of iris application? I searched the documentation and found no relevant method. At this time we can only view the source code. In the source code I found the following source code:
// GetRoutes 返回路由的信息,
// 这些信息有些可以被修改,有些不可以。
//
// 需要刷新路由器到方法或路径或处理程序更改才能进行。
func (api *APIBuilder) GetRoutes() []*Route {
	return api.routes.getAll()
}

// GetRoute 基于路由名称返回已注册路由, 否则返回nil。
// 一个提示: "路由名称" 区分大小写。
func (api *APIBuilder) GetRoute(routeName string) *Route {
	return api.routes.get(routeName)
}

// GetRouteByPath 基于模版路径 (`Route.Tmpl().Src`) 返回已注册路由。
func (api *APIBuilder) GetRouteByPath(tmplPath string) *Route {
	return api.routes.getByPath(tmplPath)
}

// GetRoutesReadOnly 返回只读授权的已注册路由,
// 你不能也不应该在请求状态下改变路由的任何属性,
// 如果想要改变可以使用 `GetRoutes()`函数替代。
//
// 它返回基于接口的切片而不是实际切片,
// 以便在上下文(请求状态)和构建的应用程序之间安全提取。
//
// 同时请看 `GetRouteReadOnly` 。
func (api *APIBuilder) GetRoutesReadOnly() []context.RouteReadOnly {
	routes := api.GetRoutes()
	readOnlyRoutes := make([]context.RouteReadOnly, len(routes))
	for i, r := range routes {
		readOnlyRoutes[i] = routeReadOnlyWrapper{r}
	}
	return readOnlyRoutes
}
As can be seen from the above source code, both GetRouteReadOnly and GetRoutes() meet our usage needs. We use GetRoutesReadOnly() to achieve this.
app = NewApp() // 初始化app
routes := app.GetRoutesReadOnly()

// 保存数据到数据库,详细代码查看 https://github.com/snowlyg/IrisAdminApi
... - There is a small problem here, that is, there is no problem with the data, but when accessing interfaces such as editing and updating with changing ids, a 403 return will appear. But obviously the permission data is already there, and other interfaces can also be accessed normally. Why is this happening?
The inspection found that the reason is: the generated (permission) policy data is like this
/v1/admin/users/{id:uint}
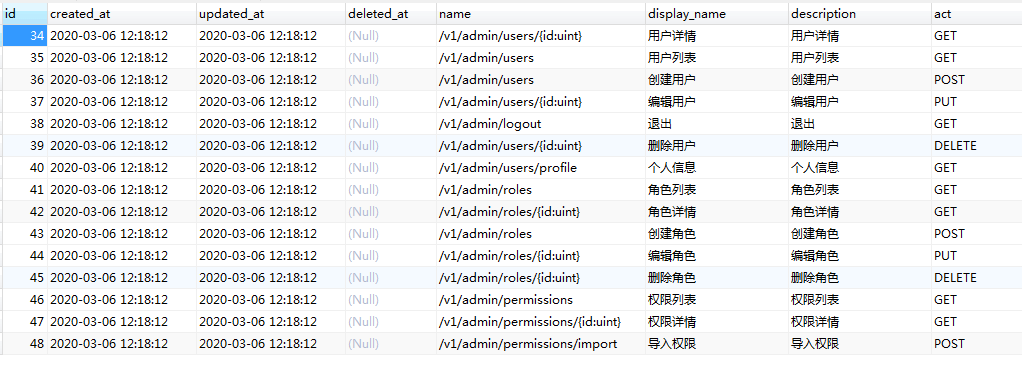
In fact, the permissions matched by casbin should be like this /dataset1/*, see casbinpolicy.csv for details
- There are two solutions at this time:
- Modify the logic of automatically generating permissions and replace
{id:uint}with*. - Modify the matching logic of casbin. Because the first method is relatively simple, we mainly discuss the second method here, since we need to modify the matching logic of casbin. First of all, we need to understand its principles. Unfortunately, like many friends who are new to casbin, I don’t know much about it. At this time, we can only learn more about it by viewing the documentation and source code.
- Modify the logic of automatically generating permissions and replace
- Open the documentation matchers I found that the matachers section applies to specific matching rules, but there is no deeper explanation of how to define them.
- Continue to view the documentation function, here we can see different matching modes, and we can even customize the matching function. And we found that there are two matching methods that may satisfy us,
keyMatch3andkeyMatch4can both match expressions similar to{}.
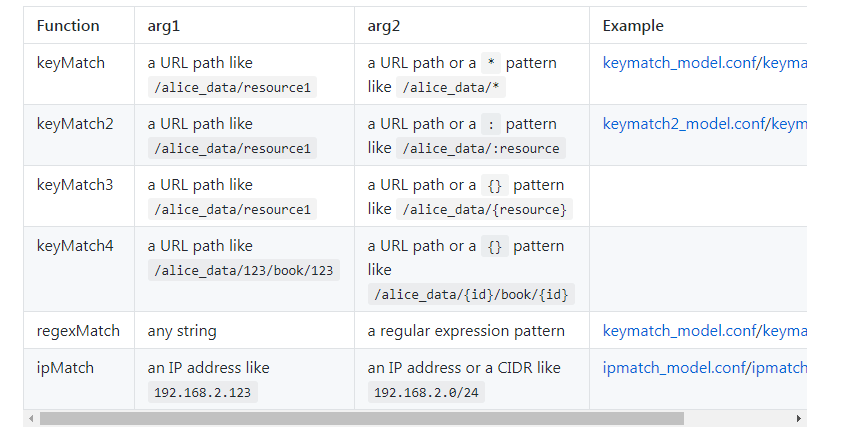
Then let’s try to modify the contents of the examples/rbac_model.conf file, change keyMatch to keyMatch3, restart the project and access the editing related interface, and find that the problem has been solved. (Found to use keyMatch4, also effective)
[matchers]
m = g(r.sub, p.sub) && keyMatch3(r.obj, p.obj) && (r.act == p.act || p.act == "*")- There is another way: to modify the default matching.
- First modify the
examples/rbac_model.conffile: remove the&& keyMatch3(r.obj, p.obj)in the middle and let casbin use the default matching rule (the default iskeyMatch).
- First modify the
[matchers]
m = g(r.sub, p.sub) && (r.act == p.act || p.act == "*")- Then add code to the
models/base.gofile:
import (
	defaultrolemanager "github.com/casbin/casbin/v2/rbac/default-role-manager"
	"github.com/casbin/casbin/v2/util"
)
......
Enforcer, _ = casbin.NewEnforcer("examples/rbac_model.conf", a)
// 修改默认匹配为 KeyMatch3
rm := defaultrolemanager.NewRoleManager(10).(*defaultrolemanager.RoleManager)
rm.AddMatchingFunc("KeyMatch3", util.KeyMatch3)
Enforcer.LoadPolicy()
......
This method is more complicated than the above method of directly modifying the examples/rbac_model.conf file. Here is just an introduction to provide another idea.
After writing it, I feel a little messy. Mainly, it is about my approach to solving needs and problems. Hope it helps. Still the same sentence: Your abilities are limited, don’t complain if you don’t like it.